Milestone 1
Steps
Setup server
- Added more ram
ESXi Setup
- Plugged into network (got ipmi network)
- Went to web gui (192.168.3.164 {DHCP})
- Logged in
- Username: ADMIN
- Password: redacted
- Used iKVM/HTML5
- Launched from usb (physically plugged into server)
- Logged in
Started ESXi install
- Used the 500GB m.2 drive as main boot drive
- Set root password
- Installed OS to disk
Put Super in rack
- Configured networking for eth0
- IP: 192.168.7.32
- Sub: 255.255.255.0
- Gateway: 192.168.7.250
Connect to ESXi in web GUI
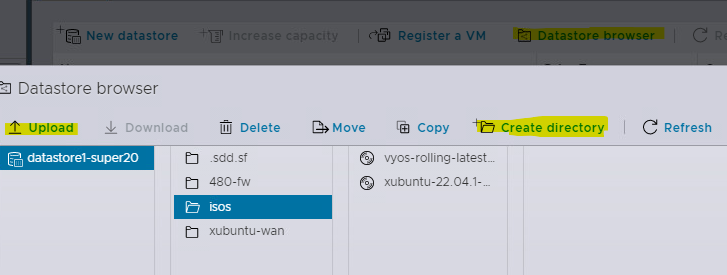
Upload ISOS
- Upload isos
- Go to Storage
- Datstore browser
- make isos folder
- Upload
Make Virtual Switch
- Go to the networking tab
- Virtual Switches
- Add standard virtual switch
- Name: 480-WAN
- And delete uplink1
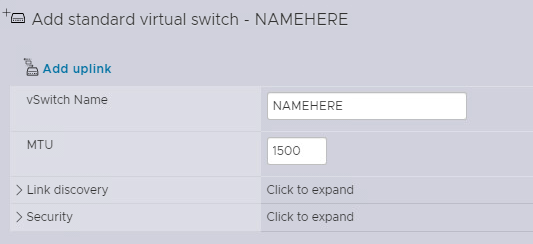
- Virtual Switches
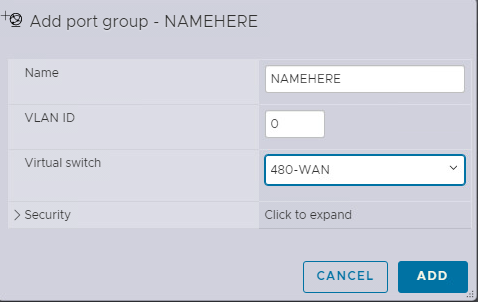
Port Groups
- Port Groups
- Add Port Group
- Name: 480-WAN
- Virtual Switch: 480-WAN
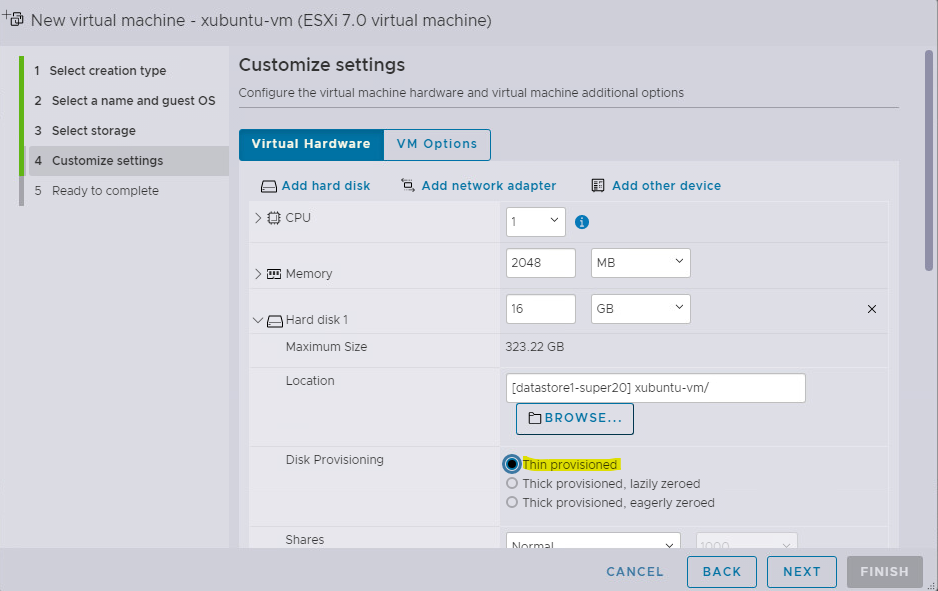
Making a New VM
-
Virtual Machines
-
Create / Register VM
-
Name
-
Fill out host information

-
Allocate proper resources for box.
-
For storage make sure to have
Thin Provisioned.
Vyos Box
- Vyos (Install is pretty simple)
- Login (Default is vyos vyos)
- Type install `Install image` and follow prompt
- For password make it basic then when we make linked clones that’s when we set the complex password
- Reboot
- You must delete the interfaces as the mac address is baked into the config
configure
delete interfaces ethernet eth0 hw-id
delete interfaces ethernet eth1 hw-ed
commit
save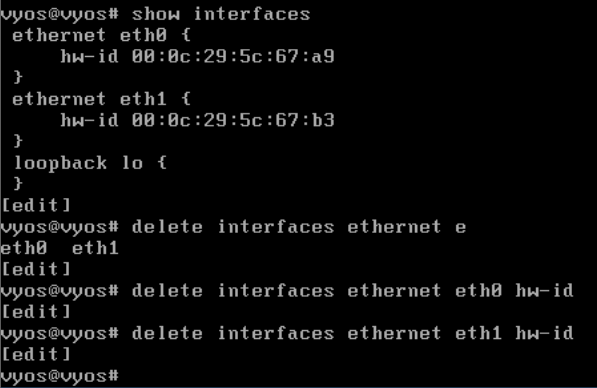
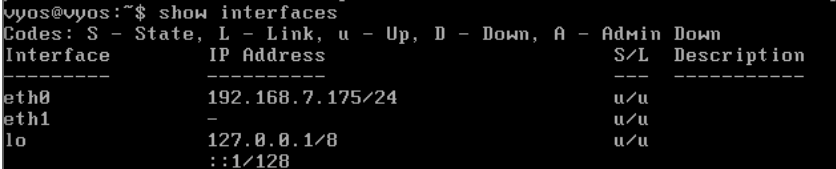
First command is to allow dhcp on boot and the second is to make sure ssh is listening anywhere
set interfaces ethernet eth0 address dhcp
set service ssh listen-address 0.0.0.0
- poweroff
Prepare VYOS for base VM
- Remove the CDrom
- Take a snapshot of 480-fw
- Use `Base` for base vm snapshots
- Turn back on Vyos
VYOS Config for Milestone 1:
set interfaces ethernet eth0 description CYBERLAB
set interfaces ethernet eth1 description 480-WAN
delete interfaces ethernet eth0 address dhcp
set interfaces ethernet eth0 address 192.168.7.62/24
set interfaces ethernet eth1 address 10.0.17.2/24
set protocols static route 0.0.0.0/0 next-hop 192.168.7.250
set system name-server 192.168.4.4
set system name-server 192.168.4.5
set service dns forwarding listen-address 10.0.17.2
set service dns forwarding allow-from 10.0.17.0/24
set service dns forwarding system
set nat source rule 10 source address 10.0.17.0/24
set nat source rule 10 outbound-interface eth0
set nat source rule 10 translation address masquerade
set system host-name 480-fw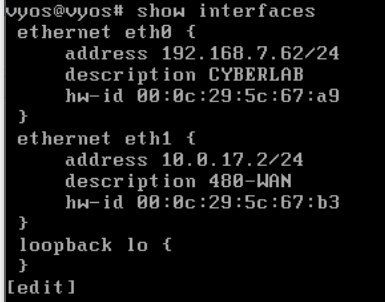
Ubuntu Box
- Make sure to have the xubuntu iso
- Install is very straight forward (any other debian based install)
- Have very default password
- Now run Devins script for setup
wget https://raw.githubusercontent.com/gmcyber/RangeControl/main/src/scripts/base-vms/ubuntu-desktop.sh
chmod +x ubuntu-desktop.sh
./ubuntu-desktop.sh
rm *.deb ubuntu-desktop.sh
showdown -h now- Take snapshot of VM
- Use `Base` for base vm snapshots
- Turn on vm and delete default user
sudo adduser paul
usermod -aG sudo paul- Logout / Login paul
userdel -r champuser-
Now network xubuntu box
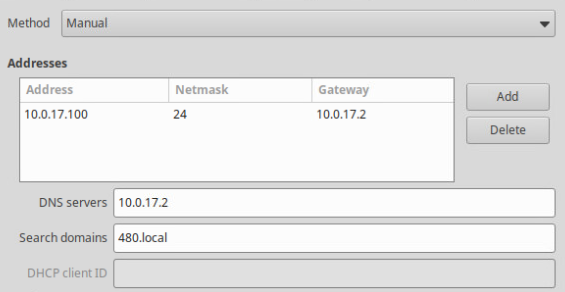
-
Set hostname
sudo hostnamectl set-hostname xubuntu-wan- All Done now proof time!