MOCs
- Network Setup
- Step 1 Install BIND
- Step 2 Configure the DNS Zone for team1.net
- Step 3 Reverse Zone File Configuration
- Step 4 Check Configuration and Restart BIND
- Step 5 Test DNS Server
- Final Config Output
- Config “/etc/bind/named.conf.local”
- Config “/etc/bind/zones/db.team1.net”
- Config “/etc/bind/zones/db.192.168.1”
Using bind on ubuntu:
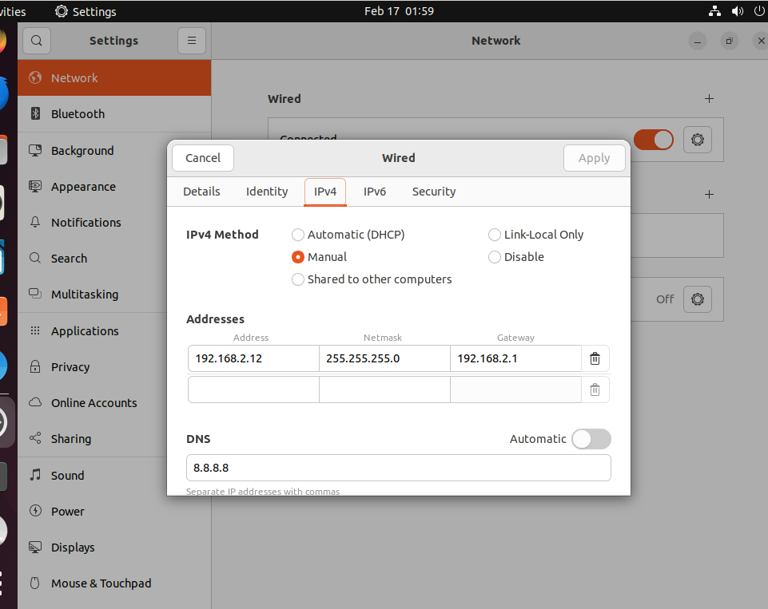
Network Setup:
Step 1: Install BIND
First, update your package lists and install BIND9:
sudo apt update
sudo apt install bind9 dnsutils
Step 2: Configure the DNS Zone for team1.net
Need to configure the forward and reverse DNS zones for team1.net.
Forward Zone File Configuration
Navigate to the BIND directory
cd /etc/bindCreate the forward zone file for team1.net. First, open the named configuration file to define the zone:
sudo nano named.conf.localAdd the following zone definition:
zone "team1.net" {
    type master;
    file "/etc/bind/zones/db.team1.net";
};
Create the directory for your zones if it doesn’t already exist:
sudo mkdir /etc/bind/zonesNext, create and edit the zone file:
sudo nano /etc/bind/zones/db.team1.netAdd the following records to the zone file:
$TTL    604800
@       IN      SOA     ns1.team1.net. admin.team1.net. (
                           2         ; Serial
                      604800         ; Refresh
                       86400         ; Retry
                     2419200         ; Expire
                      604800 )       ; Negative Cache TTL
; Name servers
@       IN      NS      ns1.team2.net.

; A records for name server and other hosts
ns1     IN      A       192.168.1.12
www     IN      A       192.168.1.5
db      IN      A       192.168.1.7
Step 3: Reverse Zone File Configuration
This step is optional but recommended for resolving IP addresses back to hostnames.
Define the reverse zone in named.conf.local:
sudo nano named.conf.localAdd the reverse zone configuration:
zone "1.168.192.in-addr.arpa" {
    type master;
    file "/etc/bind/zones/db.192.168.1";
};
Create the reverse zone file:
sudo nano /etc/bind/zones/db.192.168.1Add reverse mappings:
$TTL    604800
@       IN      SOA     team1.net. admin.team1.net. (
                           2         ; Serial
                      604800         ; Refresh
                       86400         ; Retry
                     2419200         ; Expire
                      604800 )       ; Negative Cache TTL
@       IN      NS      ns1.team1.net.
12      IN      PTR     ns1.team1.net.
5       IN      PTR     www.team1.net.
7       IN      PTR     db.team1.net.
Step 4: Check Configuration and Restart BIND
After setting up your zone files, check the configuration for errors:
sudo named-checkconf
sudo named-checkzone team1.net /etc/bind/zones/db.team1.net
sudo named-checkzone 1.168.192.in-addr.arpa /etc/bind/zones/db.192.168.1
If everything is configured correctly, restart BIND to apply changes:
sudo systemctl restart bind9Step 5: Test DNS Server
Use dig or nslookup to test your DNS server and ensure it’s resolving domain names correctly:
dig @192.168.1.12 www.team1.net +short
dig -x 192.168.1.5 @192.168.1.12 +short
Final Config Output:
Config “/etc/bind/named.conf.local”
//
// Do any local configuration here
//

// Consider adding the 1918 zones here, if they are not used in your
// organization
//include "/etc/bind/zones.rfc1918";

zone "team1.net" {
    type master;
    file "/etc/bind/zones/db.team1.net";
};
zone "1.168.192.in-addr.arpa" {
    type master;
    file "/etc/bind/zones/db.192.168.1";
};
Config “/etc/bind/zones/db.team1.net”
TTL    604800
@       IN      SOA     ns1.team2.net. admin.team2.net. (
                           2         ; Serial
                      604800         ; Refresh
                       86400         ; Retry
                     2419200         ; Expire
                      604800 )       ; Negative Cache TTL
; Name servers
@       IN      NS      ns1.team1.net.

; A records for name server and other hosts
ns1     IN      A       192.168.1.12
www     IN      A       192.168.1.5
db      IN      A       192.168.1.7
Config “/etc/bind/zones/db.192.168.1”
TTL    604800
@       IN      SOA     team1.net. admin.team1.net. (
                           2         ; Serial
                      604800         ; Refresh
                       86400         ; Retry
                     2419200         ; Expire
                      604800 )       ; Negative Cache TTL
@       IN      NS      ns1.team1.net.
12      IN      PTR     ns1.team1.net.
5       IN      PTR     www.team1.net.
7       IN      PTR     db.team1.net.